Making a planet move
Now we will give our planet some movement around the star. For this we will implement, loosely, Newton's laws of gravitation. Fig. 1 shows what it looks like. First we will start to move the planet.
![]()
Setting up the Simulation Zone
I show the main loop of the Simulation Zone and the Geometry Nodes in Fig. 2 and the outliner with the objects in Fig. 3. The first thing to notice is that in the Geometry Nodes I do not use the geometry of the object since the Group Input is not connected to anything. Instead I create one point at the origin using the Points node. This point I use as input for the Simulation zone input node. And if we skip to the output of the simulation zone and ignore its body for a second, we see that the Simulation Zone output's geometry is connected to an Instance on Points node. This node puts an instance on every point in the geometry. The object we use as an instance to put on our point is the object called 'PlanetTemplate'. In Fig. 3 you can see that this is an object in the scene. We get this object into the geometry nodes using the Object Info node and selecting the object 'PlanetTemplate' in the object box.

There are a few reasons to set up the geometry nodes like this. We have another geometry node setup on the PlanetTemplate object to give it a rotation. By setting it up like this, translation and rotations are separated from each other and you get a parent-child kind of setup. Another reason is that it is often easier to manipulate one point in space instead of a whole bunch of points (vertices), edges and faces. There are also benefits in doing it this way regarding calculation efficiency, but I will not go into this in detail now.

Working out the velocity of the planet
Ok, now we know we only have to work with one point in the simulation zone body and we need to move it around according to the physical laws of gravitation and movement. First we look at how we keep track of the velocity of the planet and then we will talk about how we add acceleration (force) to it in Fig. 4. The Simulation Zone input and output nodes always have an unused and unnamed socket which you can connect to something. Doing this will make a new variable that is passed from frame to frame in the Simulation Zone. In this case I have done this and called it velocity. You can name the socket by bringing up the Interface panel by pressing N. We want to do two things to this velocity. The first is we want to use it to move the planet one step forward at every frame. And we want to update the velocity at every frame using the acceleration.
We connect the velocity socket of the Simulation Zone input to a Vector Math node set to scale. With this scale node we want to calculate a change in position of the planet so we multiply the velocity with the time step of the frame. You get this time step from the Delta Time socket in the Simulation Zone input node. The Vector Math node then scales the velocity vector with the delta time to give the step in space. This step in space is then connected to the Offset socket of a Set Position node. This node moves the geometry in space by adding the offset to it. We then connect the geometry socket of the Set Position node to the output node of the Simulation Zone to pass the geometry to the next frame.
Now at every frame we also want to update the velocity using the acceleration of the planet. The acceleration of the planet comes from connection outside Fig. 2 and we will talk about this in the next section and the nodes are shown in Fig. 4. We will now take this acceleration as a given and we will calculate the change in velocity per frame. For this we multiply the acceleration with the Delta time to get the change in velocity. We do this by scaling the acceleration with the delta time in a Vector Math node set to Scale. Then we add the change in velocity to the velocity of the previous frame. This comes from the Simulation Zone input. We add those also using a Vector Math node but set to Add. Now the new value of the velocity is connected to the velocity socket of the Simulation Zone output node in order to pass it to the next frame.
Determining the acceleration of the planet.
Now we want to calculate the acceleration and let it change the velocity of the planet. The laws of Newton teach us that the acceleration (\(\vec{a}\)) of a body times its mass \(m\) is equal to the sum of all the forces acting on the body.
Here the arrow on the force and acceleration symbols indicates that it is a vector. A vector has both a direction and a length, thus the equation relates both the strength as the direction of the force and acceleration. The gravitational force depends on the two masses in question, on the gravitational constant \(G\) and inversely on the square of the distance between the two bodies:
Note here that \(r\) is not a vector, but only the distance between the planet and the star. The direction of the force is given by \(\hat{r}\). This is a vector with length 1 and points in the radial direction, thus from the star to the planet. Now because there is a minus sign in the equation the gravitational force is directed towards the central star. In other words, the planet is pulled to the star. The strength of the force depends on the distance between the planet and the star as \(1/r^2\). This means the force is strongest at shorter distances and becomes weaker when the two bodies move apart.
Fun
For the physics interested peoples! Here we see that the acceleration of a body in a gravitational field does not depend on the mass of the body (only on the mass of the other body). Thus a bowling ball and a feather fall equally fast! But why do we almost always observe a difference on Earth? Do you want proof of this with less equations and more dramatic music? Check out this BCC clip with Brian Cox!
Now, back to business. To make things a bit easier for ourselves we will skip all the exact values and units of the constants, we will simply take \(G\) and \(M\) into one constant \(C\) and we will tweak this one to get some different movements. So we need to program the following equation in Geometry Nodes:
Here I have separated the direction and strength of the force. The direction is \(-\hat{r}\), while the size of it is \(C/r^2\).
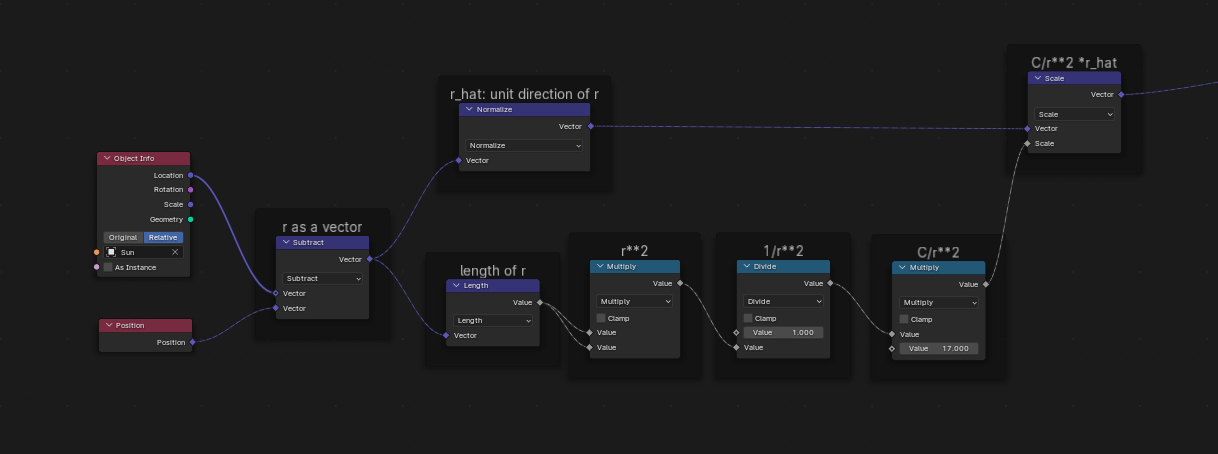
It is time to implement our formula into Geometry Nodes. In order to calculate the separation (distance) vector \(\vec{r}\) between the star and planet, we need the location of them. We get the location of the planet with a Position node. This node does not need any inputs, it collects the position of the geometry to which it is eventually connected in the Node tree. The position of the star we get by again using an Object Info node. In this node we select the star object and we set it to relative. We now get the distance vector \(\vec{r}\) by subtracting the two position vectors of the objects using a Vector Math node set to Subtract. We now get the direction of \(\vec{r}\), called \(\hat{r}\) in our equation, by normalizing the vector \(\vec{r}\). We get the size \(r\) of \(\vec{r}\) by using the Vector Math node set to Length. We then square \(r\) and calculate \(1/r^2\) and we multiply it by a constant. Then we create one acceleration vector again by multiplying \(C/r^2\) with the direction of \(\hat{r}\). The resulting acceleration is using in the Simulation Node to update the velocity at every frame.
💻 Exercise: Translation
a) Implement the Geometry Nodes of this section in Blender yourself.
b) In the Input node of the Simulation Node we have given the planet an initial velocity of (3,0,0). See Fig. 2. Try some different velocities and see what kind of orbits you get. Are they all stable (e.g. does the planet keep orbiting the star)?
c) If you like a challenge. We know that all gravitational bodies pull on each other, but in this section we have only implemented the pull of the star on the planet. Often this is a nice approximation since the star is much heavier than the planet. But think about how you could incorporate the pull of the planet on the star also.
Links
- For the textures of the planets I have used the beautiful textures from the Solar System Scope project which are based on NASA images.