Geometry, colors and materials
Creating an object with a mesh
If we want to create a new mesh we can do this by calling the new function like this:
We can actually verify this worked correctly by checking the value of obj.data:
If you check the Outliner in the user interface you will see both the object newObject and the mesh newMesh linked to it.
Now we have an empty mesh, linked to an object. We will now construct a simple piece geometry to show how this is done in Blender. Vertices are defined by their x, y and z values like this:
Edges are defined as a tuple holding two indices pointing to two vertices in the verts list. So (0,1) refers to a line from vertex (0,0,0) (index 0 in verts) to (0,2,0) (index 1 in verts) in this example. We make the following edges:
To make faces we need three or more vertices. Per face you make a tuple of three or more indices pointing to three vertices in the verts list. For example the face (0,1,2) is a face made up from the vertices (0,0,0), (0,2,0) and (0,1,2), which are at index 0, 1 and 2 in the verts list. For now lets make one face:
We now use a function from the Python API to make a mesh from our verts, edges and faces:
Now the mesh and the object are created, but it does not yet show in the 3D viewport or the Outliner. This is because we still need to link the new object to an existing collection and in so doing to a scene.
To summarize here is the full code to generate this geometry:
import bpy

# Create a new mesh
ob_name = "triangle"
mesh = bpy.data.meshes.new(ob_name + "_mesh")

# Create a new object with the mesh
ob = bpy.data.objects.new(ob_name, mesh)

# Define some geometry
verts = [ (0,0,0), (0,2,0), (0,1,2) ]
edges = [ (0,1), (1,2), (2,0) ] # These are indices pointing to elements in the list verts
faces = [ (0,1,2) ] # These are indices pointing to elements in the list verts

# Add it to the mesh
mesh.from_pydata(verts, edges, faces)

# Link the object to the first collection
bpy.data.collections[0].objects.link(ob)
Tips
- Note that in general you do not need to explicitly specify mesh edges, as these will be generated automatically based on the faces specified. It's only when you want to have edges that are not connected to faces that you need to specify them explicitly.
- All objects in Blender (and object data of the same type, i.e. all meshes) are enforced to have unique names. When
using the Python API this is no different. So if you create an object with
bpy.data.objects.new("obj", mesh)and there already is an object named "obj" the name of the new object will be automatically set to something else. This can become important if you generate many objects (say in a loop) but still want to be able to refer to them later by name.
💻 A filled disk from scratch
In the text above we created a triangle, now as an exercise let's create a spherical disk. First create a ring of vertices, then create edges and a face.
Adding vertex colors to a mesh
Not seeing vertex colors?
In the video below there's an essential step that's only shown near the end (around 7:00), which setting a material on the geometry. If the correct material isn't set the vertex colors won't show.
Vertex coloring is a way to color a mesh without using textures or uv-mapping. It works by assigning for every face that a vertex is a member of a color to that vertex. So a vertex can have different colors for each of the different faces it is in. Let's say we have a mesh, named "triangle_mesh": mesh = bpy.data.meshes['triangle_mesh'], the vertex colors for this mesh will be stored in mesh.vertex_colors. If the mesh does not have a vertex color layer yet, you can make a new one with: mesh.vertex_colors.new(name='vert_colors'). Now we have a color layer to work with: color_layer = mesh.vertex_colors['vert_colors'].
💻 Making triangles and a vertex color layer
Let's take the triangle we made above, but let's add another triangle to it, attached to the first. The code would look like this:
import bpy
# Create a new mesh
ob_name = "triangle"
mesh = bpy.data.meshes.new(ob_name + "_mesh")
# Create a new object with the mesh
ob = bpy.data.objects.new(ob_name, mesh)
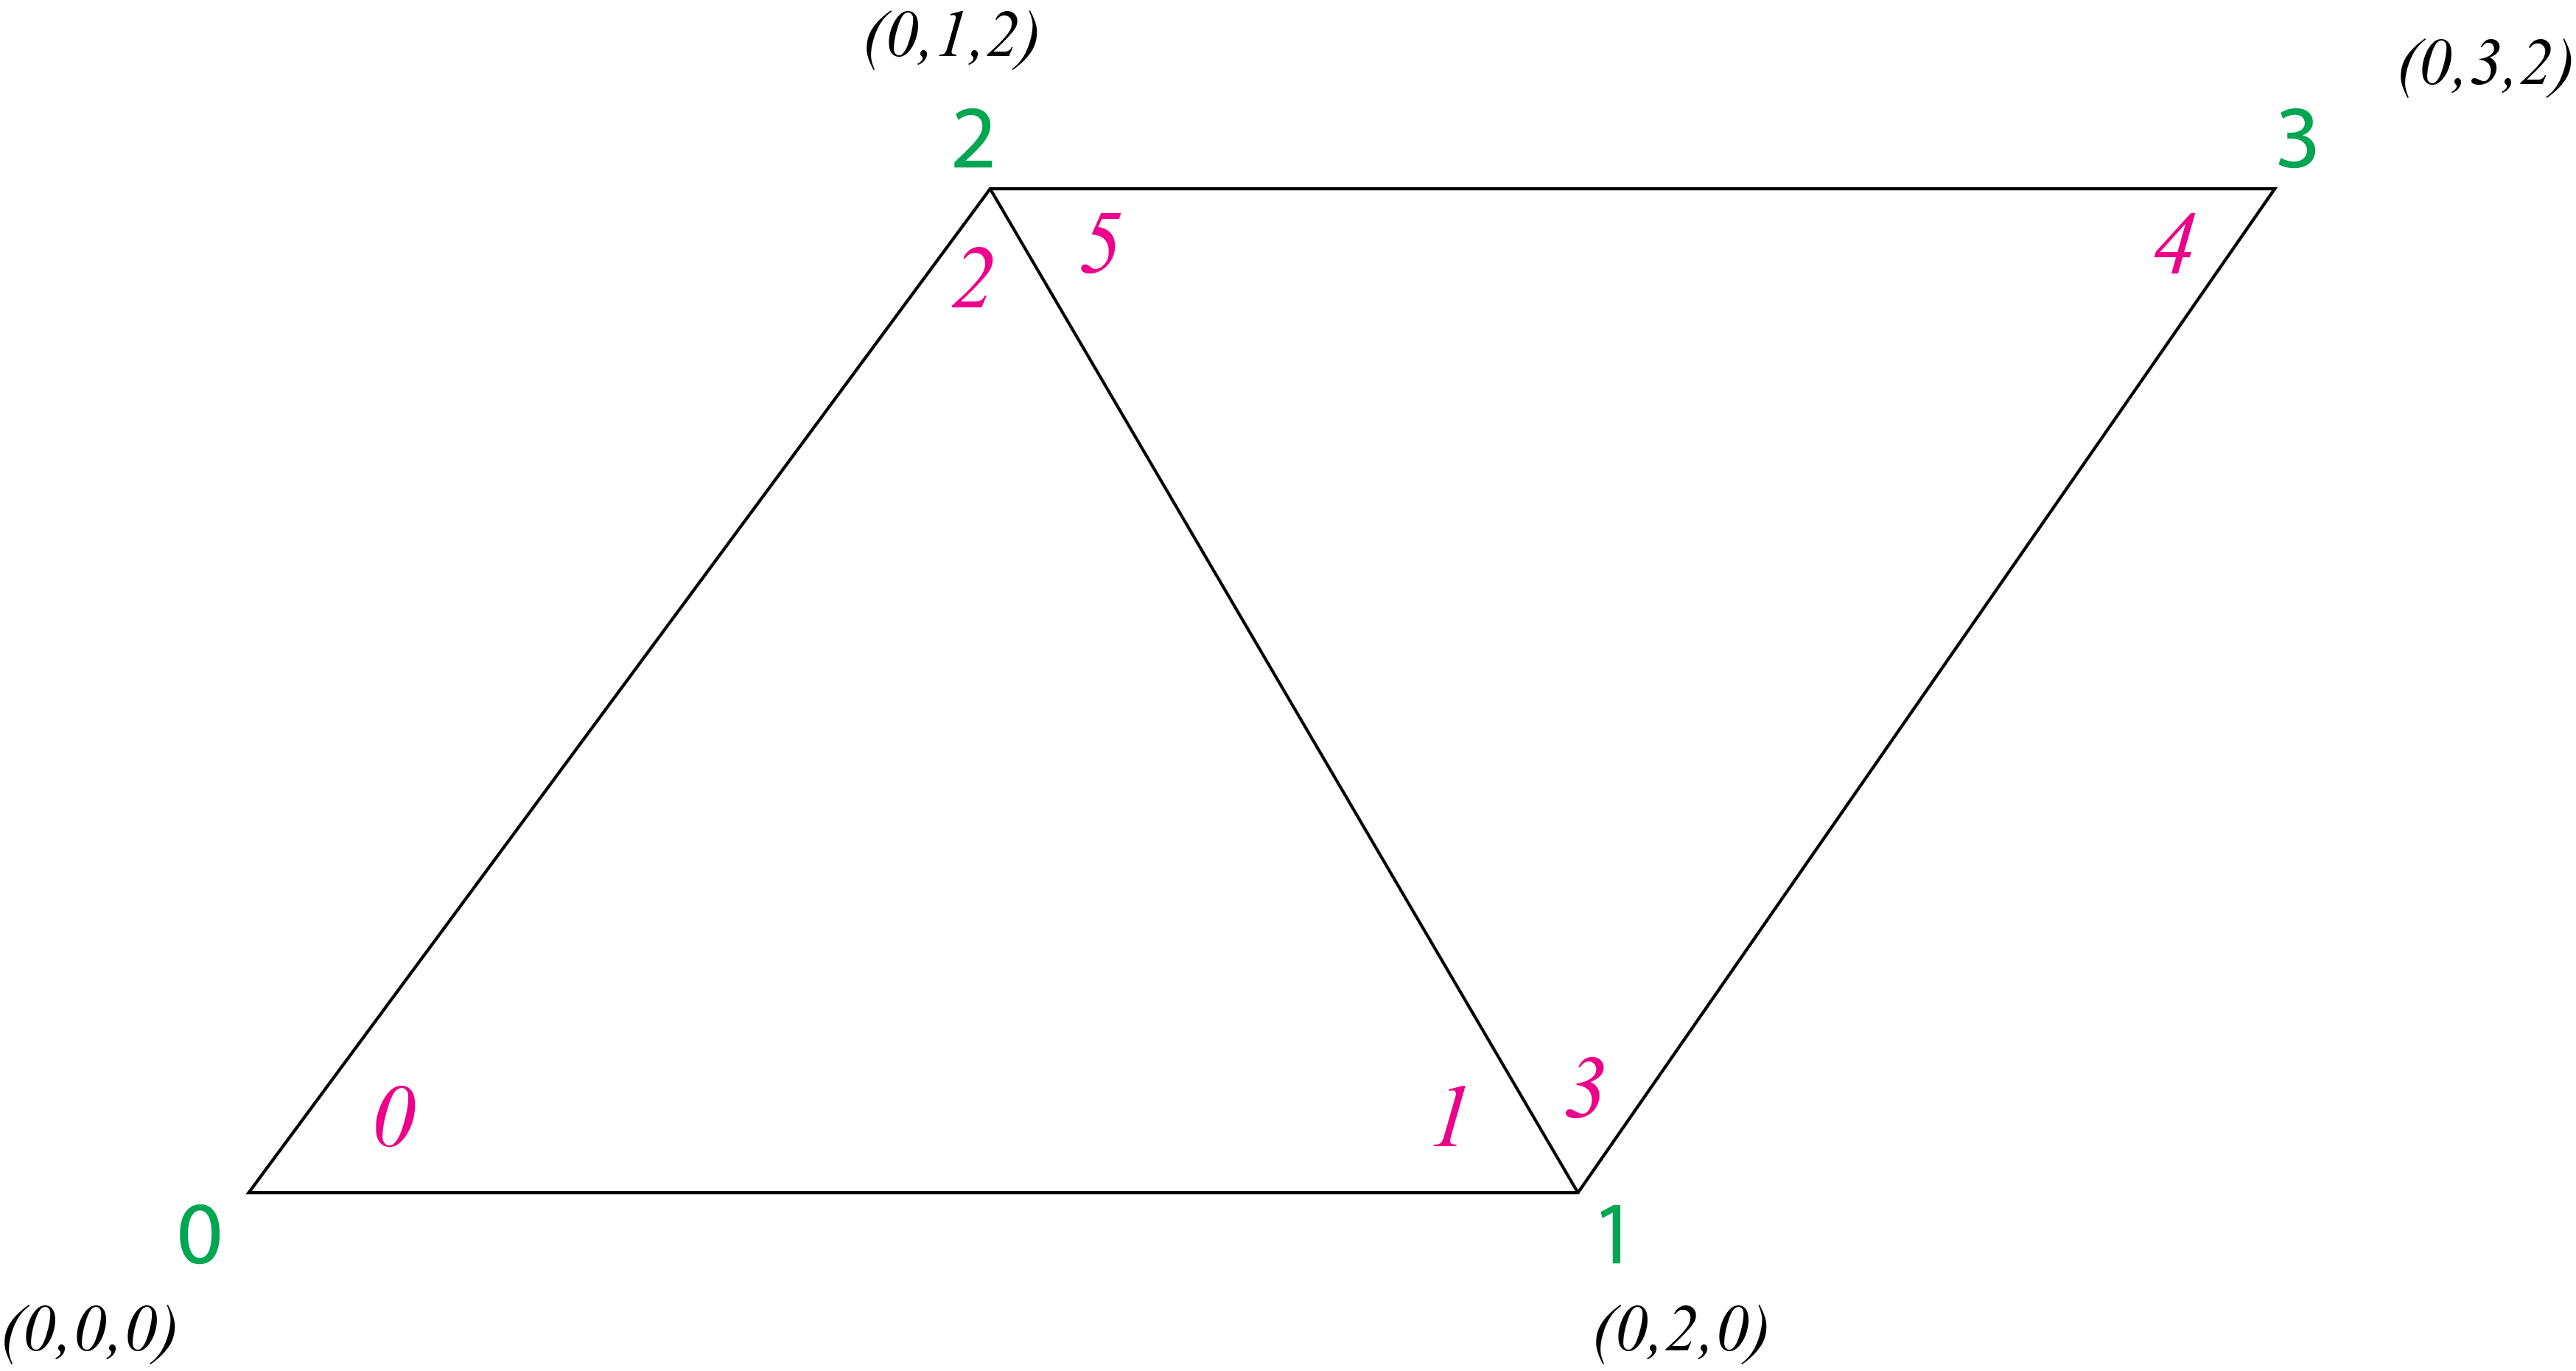
# Define some geometry
verts = [
(0,0,0), (0,2,0), (0,1,2) ,
(0,3,2)
]
edges = [
(0,1), (1,2), (2,0),
(1,3), (3, 2)
] # These are indices pointing to elements in the list verts
faces = [ (0,1,2), (1,3,2) ] # These are indices pointing to elements in the list verts
# Add it to the mesh
mesh.from_pydata(verts, edges, faces)
# Link the object to the first collection
bpy.data.collections[0].objects.link(ob)
Now make a vertex color layer for your triangles. Then inspect how many entries are in color_layer = mesh.vertex_colors['vert_colors']. Why are they the same or different from the total number of vertices in the mesh?
In an earlier exercise we saw that color_layer.data contains six entries while we only have four vertices in the mesh. This is because a vertex has a color for every face it is in. So vertex (0,2,0) and (0,1,2) are each in two faces, while the other two vertices are only in one face. So the former vertices have two entries in the color layer, one for each face they are in, the latter only one color entry.
The link between vertex indices in a mesh and those in the vertex color layer can be deduced from the polygons in mesh.polygons. Let's take one polygon from the triangles, lets say the first (poly = mesh.polygons[0]). Now, for one vertex in the polygon, poly.vertices gives you the index of the vertex in the mesh and poly.loop_indices gives you the index of the vertex in color_layer.data. See Fig. 3.
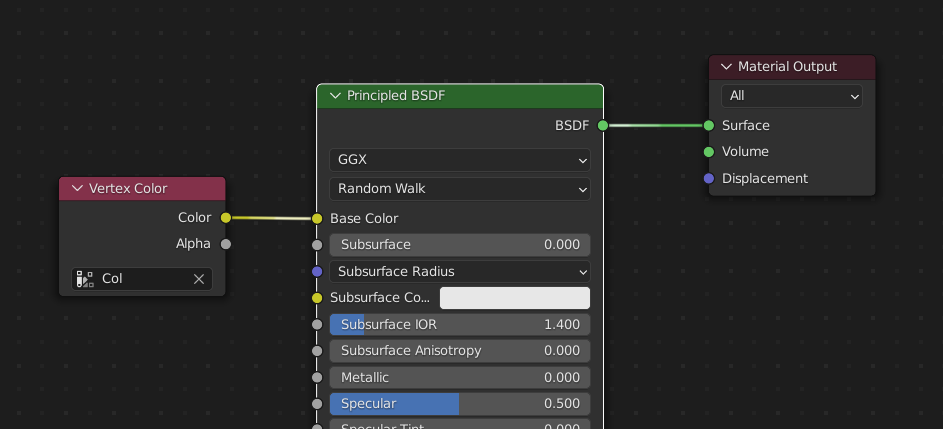
Once you have set colors for your vertices you need to set up the shader of the object. For this go to the Shading workspace. Create a Vertex Color node and connect it to a Principled BSDF (connect Color output to Base Color input). And then make a Material Output and connect the Principled BSDF to the Surface input of the Material Output. See Fig. 4.
💻 Coloring your triangles
Let's take the two connected triangles of exercise 4. We will color them in two different ways, using vertex coloring and Python scripting:
- Make the first triangle (face (0,1,2)) green and the second (face (1,3,2)) red.
- Now color vertex (0,0,0) and (0,3,2) red and (0,2,0) and (0,1,2) green.
Adding a material
You can also add materials through the Python API. As an example to show how you could do this, let's add a material to the triangle from exercise 4 in the last section. Materials are stored in bpy.data.material and we can make a new material:
# Make material
triangle_material_name = "triangle_mat"
mat = bpy.data.materials.new(triangle_material_name)
Before we start making nodes we remove the automatically generated nodes.
We will make two nodes, one Principled BSDF shader and an output node. We can make the shader by making a new node. How a node type is called you can search up in Blender in the following way. Go to theShading workspace and open the add menu in the Shader Editor. Now go to Shader and hover over Principled BSDF until an information pop-up appears. In the pop-up you can find how the node type is called. See Fig. 5.
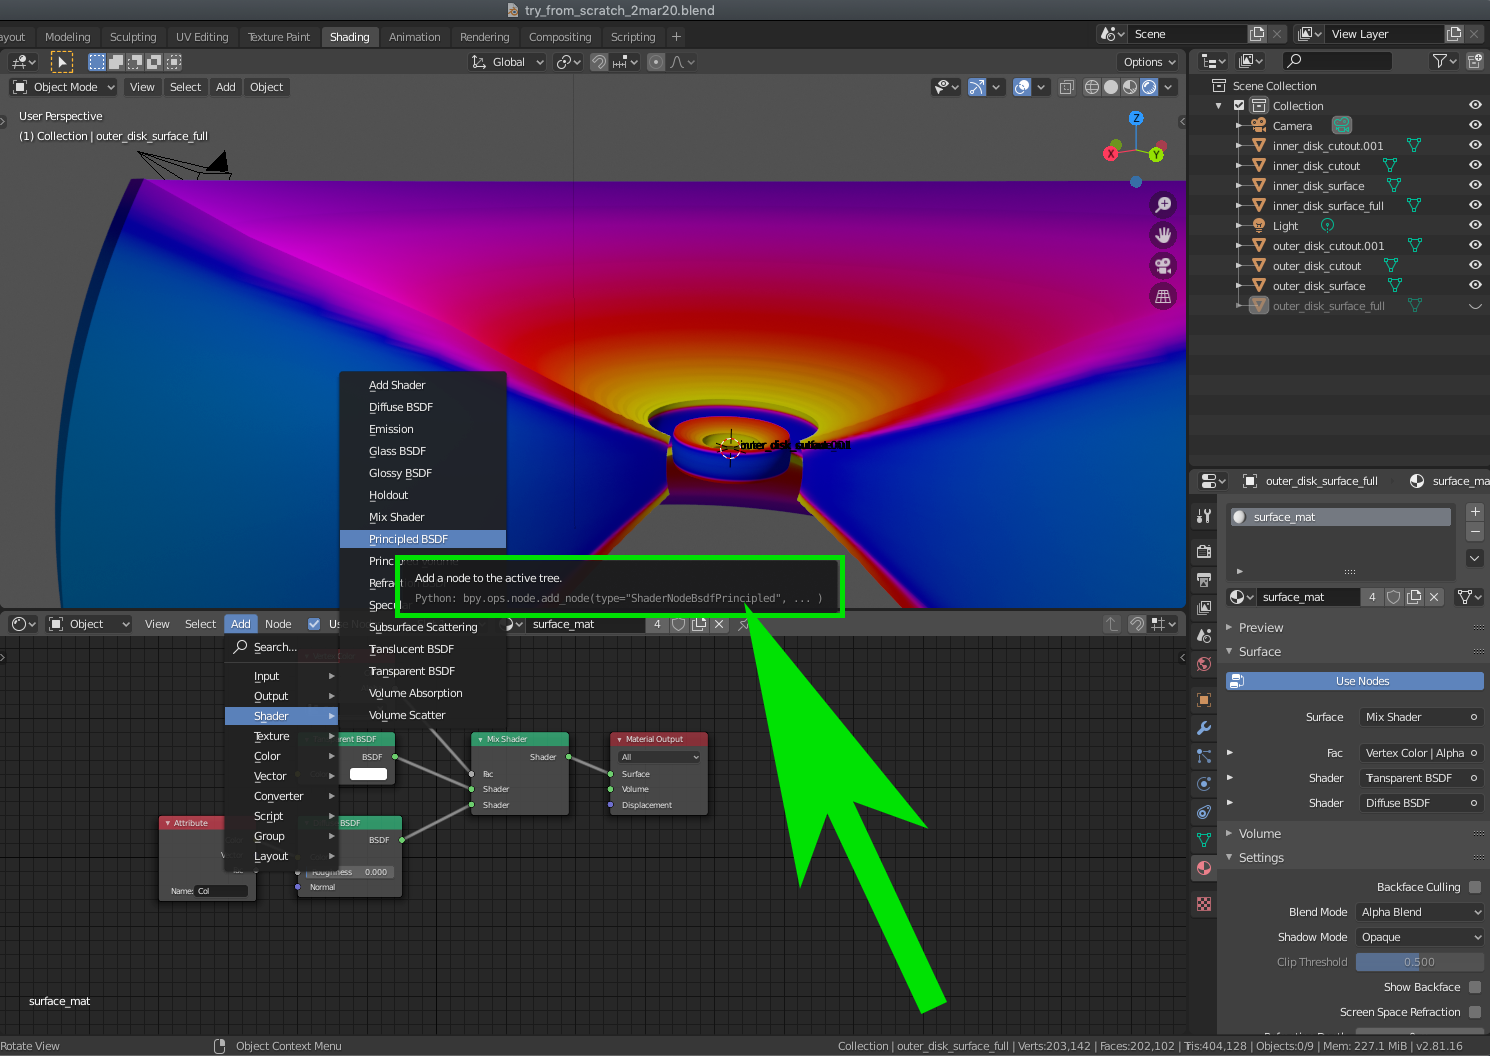
Add menu and hovering over the node of your interest
If you also want to organize the nodes in the Shader Editor you can place the node like this:
We can set the inputs of the Principled BSDF shader to a default_value. We can now also make an output node and place it in the Shader Editor. Links between nodes can be made using the links in the node_tree. A new link will take outputs and inputs from the nodes you want to link. Now we only need to add the material to the mesh containing the spherical disk.In summary, the total code for making the material is:
# Make material
triangle_material_name = "triangle_mat"
mat = bpy.data.materials.new(triangle_material_name)
mat.use_nodes = True
nodes = mat.node_tree.nodes
# Clear default nodes
nodes.clear()
shader = nodes.new(type='ShaderNodeBsdfPrincipled')
shader.location = 0, 300 # Location in the node window
shader.inputs['Base Color'].default_value = (1,0,0,1)
# Create an output for the shader
node_output = nodes.new(type='ShaderNodeOutputMaterial')
node_output.location = 400, 300
links = mat.node_tree.links
links.new(shader.outputs['BSDF'], node_output.inputs['Surface'])
mesh.materials.append( mat )