Materials
As shown in one of the introductory exercises for the Python API it is possible to use Python to create a node-based shader. In most cases using the node-based editor in the UI is the preferred option due to its interactivity, but for certain cases it can be interesting to use Python.
The general workflow for this is to create the necessary shader nodes, connect them through links as needed and then set the material on the relevant mesh.
# Create a new material
mat = bpy.data.materials.new("my material")

# Enable shader nodes on the material
mat.use_nodes = True

# Remove the default nodes
nodes = mat.node_tree.nodes
nodes.clear()

# Add a Principled BSDF shader node and set its base color
shader = nodes.new(type='ShaderNodeBsdfPrincipled')
shader.location = 0, 300
shader.inputs['Base Color'].default_value = (1,0,0,1)

# Add a Material Output node
node_output = nodes.new(type='ShaderNodeOutputMaterial')
node_output.location = 400, 300

# Add a link between the nodes
links = mat.node_tree.links
links.new(shader.outputs['BSDF'], node_output.inputs['Surface'])

# Add material to the mesh's material slots
mesh.materials.append(mat)
A node's inputs and outputs can be referenced by name. This can then be used to set values on inputs, or connect outputs to inputs, as shown. For example, for the Principled BSDF node used above:
>>> sorted(shader.inputs.keys())
['Alpha', 'Anisotropic', 'Anisotropic Rotation', 'Base Color',
'Coat IOR', 'Coat Normal', 'Coat Roughness', 'Coat Tint', 'Coat Weight',
'Emission Color', 'Emission Strength', 'IOR', 'Metallic', 'Normal',
'Roughness', 'Sheen Roughness', 'Sheen Tint', 'Sheen Weight',
'Specular IOR Level', 'Specular Tint', 'Subsurface Anisotropy',
'Subsurface IOR', 'Subsurface Radius', 'Subsurface Scale',
'Subsurface Weight', 'Tangent', 'Transmission Weight', 'Weight']

>>> shader.outputs.keys()
['BSDF']
The location attributes set above are not strictly needed if you're not going to work on the shader network in the Shader Editor in the UI. But they help to make the node network layout somewhat visually pleasing.
Material slots
The last line in the Python code above adds the created material to the mesh's material slots. An object can have multiple materials assigned to it and each assigned material uses a so-called material slot.
Each polygon in a mesh can only use a single material, by specifying the material index (i.e. slot) to use for that polygon. This allows different parts of a mesh to use different materials/shaders.
By default all faces in a mesh will reference material slot 0. But here's an example of a cube mesh that uses 3 different materials:
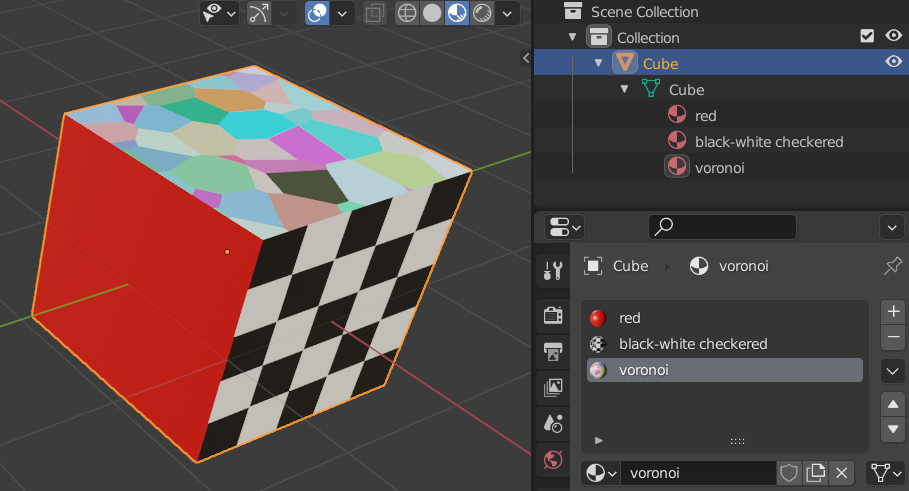
Inspecting the underlying material data:
# Get the mesh, as the material is linked to the mesh by default
>>> o = bpy.data.objects['Cube']
>>> m = o.data

# The material slots used
>>> list(m.materials)
[bpy.data.materials['red'], bpy.data.materials['black-white checkered'],
bpy.data.materials['voronoi']]

# Polygon -> slot index
>>> m.polygons[0].material_index
2
>>> m.polygons[1].material_index
0
>>> m.polygons[2].material_index
0
>>> m.polygons[3].material_index
0
>>> m.polygons[4].material_index
1
>>> m.polygons[5].material_index
0
Material indices can be set per polygon, or set as an array in one go:
# Material slot index for a single polygon
m.polygons[0].material_index = 0

# Set all polygon material indices
face_materials = [0, 1, 2, 2, 1, 0]
m.polygons.foreach_set('material_index', face_materials)
# Force an update of the mesh, needed in this case
m.update()